EVM Subchains
Introduction
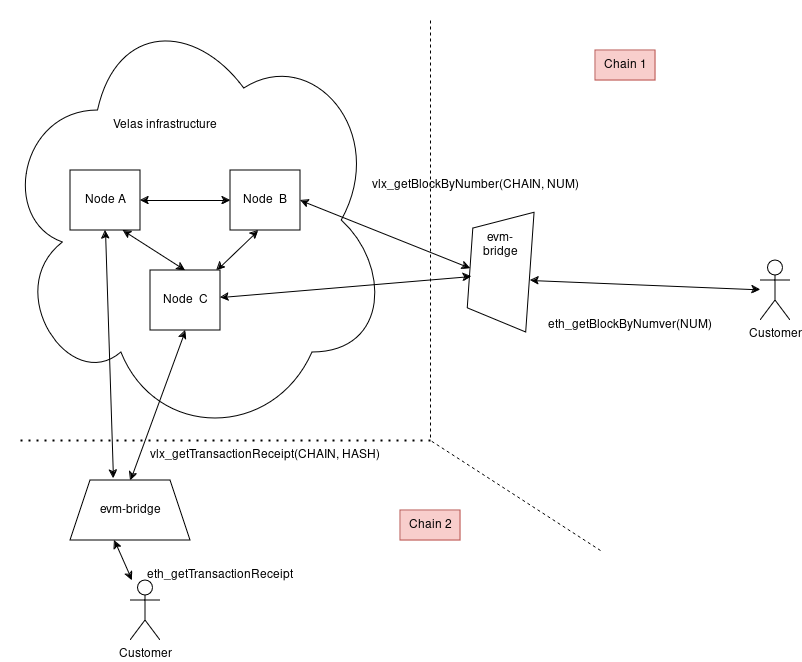
Velas EVM Subchains is a solution that allows you to use Velas as the infrastructure for your custom EVM-compatible chain. Each EVM Subchain is isolated and provides Ethereum JSON-RPC API (the same as in the Velas EVM Chain) but utilizes a custom token as its "main" token.
For end-users of the custom chain, fees are paid with their "main" token. However, the processing costs on Velas are paid with the native VLX token, meaning that the administrator of the chain is responsible for paying fees in VLX on behalf of the custom chain's end-users.
Velas provides a way for administrators to create subchains, manage fees, and export subchain states if needed. The administrator is also responsible for hosting an EVM Bridge — a thin proxy that maps Ethereum calls to real API calls and routes them to the nodes.
Prerequisites
To deploy a new subchain, you need to have the velas CLI and the subchain-manager tool installed. These tools are available in our release packages or can be built manually.
Download from Release
Download the latest release from Velas Releases for your platform and place it in the appropriate path. For more information, check the Velas CLI Documentation.
Building from Source
Binaries for some platforms may not be available in Velas Releases but are still supported by Velas.
If you cannot find a binary for your platform on the release page, you can follow the instructions to build it from the source code.
-
Clone the repository:
git clone https://github.com/velas/velas-chain
cd velas-chain -
Select the branch or tag that supports Velas Subchains (needed for alpha testers):
git switch zeta -
Install the required dependencies:
For Debian-based distributions:
sudo apt-get update
sudo apt-get install libssl-dev libudev-dev pkg-config zlib1g-dev llvm clang make cmake protobuf-compiler
For Fedora:
sudo dnf install openssl-devel systemd-devel pkg-config zlib-devel llvm clang cmake make protobuf-devel protobuf-compiler perl-coreFor macOS:
sudo brew install openssl pkg-config zlib llvm clang cmake make protobuf protobuf-compiler perl-core -
Install Rust:
curl https://sh.rustup.rs -sSf | sh
source $HOME/.cargo/env
rustup component add rustfmt
cargo --version -
Build the packages:
cargo build --release -p solana-cli -p subchain-manager -p evm-bridge -p velas-keygenThe output files can be found in
./target/release:./target/release/velas --version
./target/release/evm-bridge --version
# Since the subchain manager is a TUI, you can't request its version, but you can check that it exists.
ls -la ./target/release/subchain-manager
In the next chapters, we will use the subchain-manager and velas CLI executables directly without providing a path. For manual builds, you need to place the binaries somewhere in your $PATH, prepend all commands with ./target/release/ (without a space), or update the $PATH environment variable to include your ./target/release folder by executing the command:
export PATH=$PATH:$(pwd)/target/release
Generating Keys and Obtaining VLX for Deployment (for Testing Purposes)
This guide assumes that you have a native VLX account with enough tokens to deploy an EVM Subchain. Currently, the cost of EVM Subchain deployment is 1,000,000 VLX.
If you do not have sufficient tokens and are using the devnet for testing, you should generate keys and request an airdrop:
velas-keygen new
velas -u devnet airdrop 1000200
Setting Up the Subchain
First, you need to generate a configuration.
Run subchain-manager in TUI mode:
subchain-manager
#TODO: export config from geth init
It will guide you through the process.
An example of the process might look like
❯ subchain-manager

> This program helps to create and manage subchains. It allows create config for new subchain, that can be later used to deploy subchain, and other infrastrucutre (like bridges and explorers). Generate a new config
> Choose a name for the chain: My New super chain
> Pick a name for the token: MNSC
> Select a Chain ID (should be unique, and start with 0x56): 0x5623
> Hardfork version: Istanbul hardfork (currently only available).
> Store config in file: my-config.toml
> Minting address: 0x1a64…14f1
> Balance: 12312300000
? One more minting address (esc to skip): <canceled>
> Select a token symbol: $
> Provide RPC URL for future tooling: foo.bar.baz
At the end, you will have a configuration file (for example, my-config.toml) that can be used to deploy a custom chain.
The next step is to deploy the subchain.
The configuration can be deployed using the same subchain-manager in TUI mode, or for better scripting, in CLI mode.
./target/release/subchain-manager create-and-deploy --config-file my-config.toml --velas-rpc https://api.devnet.velas.com
Check out the clusters to get a list of available Velas clusters and their JSON-RPC addresses.
At this point, the custom EVM Subchain is successfully deployed. However, to process EVM transactions, you need to fund the Native VLX Account of the newly created EVM Subchain with VLX tokens to cover subchain transaction fees.
-
Find the Native Velas Account that handles the EVM Subchain state:
subchain-manager get-subchain-address --config-file my-config.toml
EVM subchain state is stored in: FTBiU6qAupE7SqmFEXW8tX3tdhNLxnRwnX9LamCJGLPw -
Transfer some Native VLX tokens to that account:
velas -u devnet transfer FTBiU6qAupE7SqmFEXW8tX3tdhNLxnRwnX9LamCJGLPw 100
Starting the EVM Bridge
The final step is to start a thin proxy that will provide the eth_* JSON-RPC API for the EVM Subchain end user.
evm-bridge /home/$USER/.config/velas/id.json http://api.devnet.velas.com 127.0.0.1:8545 <CHAIN_ID> --subchain --no-simulate --borsh-encoding
Don't forget to replace <CHAIN_ID> with the Chain ID of your EVM Subchain.
The EVM Bridge can easily scale horizontally, but it contains a local mempool, so ensure that your load balancer can track users and route requests to the correct evm-bridge instance.