Setup a Velas Validator
This guide describes the process to start a validator node on the Velas network. Nodes require some technical knowledge about networks and Unix Linux systems. Before starting, make sure you can accomplish necessary tasks such as:
- Installation and configuration of Unix / Linux systems
- Network configuration (open ports, firewall configuration, NAT configuration, etc.)
- Willingness to keep the system functional and updated
Hardware and OS Requirements
Check this page for the complete hardware and software requirements.
You can run the software on any Linux platform by making your own settings and installing the necessary libraries and dependencies. In our tests, the software ran for weeks without problems on Ubuntu 20.04 and RHEL 8. Although it is possible to run the node on OSX or Windows, it is not recommended.
GPU & CUDA Libraries
While a CPU-only node may be able to keep up with the initial idling network, once transaction throughput increases, GPUs will be necessary.
What kind of GPU?
We recommend NVIDEA Turing and volta family GPUs 1660ti to 2080ti series consumer GPU or Tesla series server GPUs. We do not currently support OpenCL and therefore do not support AMD GPUs.
CUDA is required to make use of the GPU on your system. The provided Velas release binaries are built on Ubuntu 18.04 with CUDA Toolkit 10.1 update 1. If your machine is using a different CUDA version then you will need to rebuild from the source.
Checking GPU & CUDA Version
Once you have managed to install the necessary graphics driver for your GPU and CUDA Toolkit 10.1 update 1, you can check the installation with the following commands:
Check that your NVIDIA graphics card is installed and working using nvidia-smi command, the output should look like this:
[velas@node ~]$ nvidia-smi

+-----------------------------------------------------------------------------+

| NVIDIA-SMI 460.73.01    Driver Version: 460.73.01    CUDA Version: 11.2     |

|-------------------------------+----------------------+----------------------+

| GPU  Name        Persistence-M| Bus-Id        Disp.A | Volatile Uncorr. ECC |

| Fan  Temp  Perf  Pwr:Usage/Cap|         Memory-Usage | GPU-Util  Compute M. |

|                               |                      |               MIG M. |

|===============================+======================+======================|

|   0  GeForce RTX 2070    Off  | 00000000:21:00.0 Off |                  N/A |

| 35%   52C    P2    59W / 175W |    235MiB /  7982MiB |     92%      Default |

|                               |                      |                  N/A |

+-------------------------------+----------------------+----------------------+
Check that your version of CUDA really matches the necessary one:
[velas@node ~]$ nvcc --version
nvcc: NVIDIA (R) Cuda compiler driver
Copyright (c) 2005-2019 NVIDIA Corporation
Built on Sun_Jul_28_19:07:16_PDT_2019
Cuda compilation tools, release 10.1, V10.1.243
Note: You can choose to enable or not CUDA when starting your node software, to force the software to use the cuda libraries don't forget to add --cuda argument in your execution line.
If you experience unexpected shutdowns or crashes, remove the --cuda argument and try running the software without it to rule out any other problems.
STEP 1. Install the Velas Tool Suite
Check the latest release available visiting our Github page, at the time of writing this guide is 0.3.4 as you will see in the following image
Download Velas install tool
[velas@node]$ wget https://github.com/velas/velas-chain/releases/download/v0.3.4/velas-install-init-x86_64-unknown-linux-gnu
Assign execution permissions
[velas@node]$ chmod +x velas-install-init-x86_64-unknown-linux-gnu
Install the last release, replacing LATEST_RELEASE for release number
./velas-install-init-x86_64-unknown-linux-gnu LATEST_RELEASE
[velas@node]$ ./velas-install-init-x86_64-unknown-linux-gnu 0.3.4
Note: At the time of writing this guide the latest version is 0.3.4
You will get an output similar to this
Configuration: /home/velasnode/.config/velas/install/config.yml
Active release directory: /home/velasnode/.local/share/velas/install/active_release
* Release version: 0.3.4
* Release URL: https://github.com/velas/velas-chain/releases/download/v0.3.4/velas-release-x86_64-unknown-linux-gnu.tar.bz2
 Update successful
Adding export PATH="/home/velasnode/.local/share/velas/install/active_release/bin:$PATH" to /home/velasnode/.bash_profile
Close and reopen your terminal to apply the PATH changes or run the following in your existing shell:
export PATH="/home/velasnode/.local/share/velas/install/active_release/bin:$PATH"
Execute export PATH command as the terminal suggest you
[velas@node]$ export PATH="/home/velasnode/.local/share/velasnode/install/active_release/bin:$PATH"
Important, use the export command that your terminal shows since it is different for each user
Use velas command to see a complete list of all available actions, which indicates that you have successfully installed the software.
Here is more information about CLI usage.
STEP 2. Configure Velas CLI
Connect CLI with Velas mainnet using velas config set command
[velas@node]$ velas config set --url https://explorer.velas.com/rpc
Config File: /home/user/.config/velas/cli/config.yml
RPC URL: https://explorer.velas.com/rpc
WebSocket URL: wss://explorer.velas.com/rpc (computed)
Keypair Path: /home/user/.config/velas/id.json
Commitment: confirmed
Confirm the cluster Is reachable and checks your software/cluster version
[velas@node ~]$ velas transaction-count
17729450
[velas@node ~]$ velas --version
velas-cli 0.3.4
[velas@node ~]$ velas cluster-version
0.3.4
You can update your version if it differs from that of the cluster using the next command
velas-install-init VERSION_NUMBER
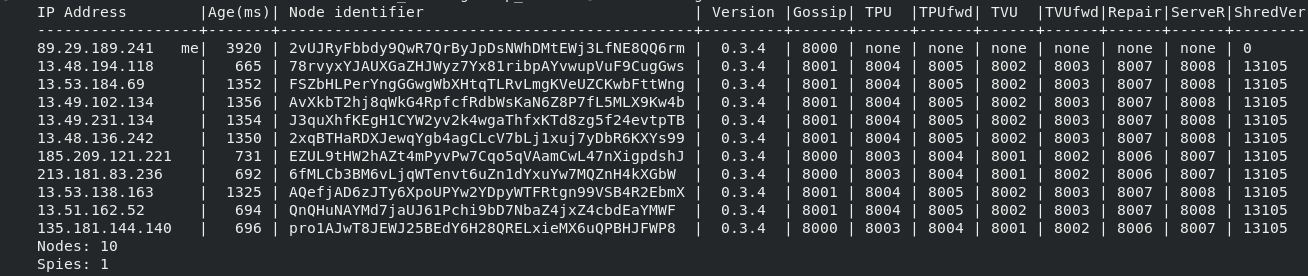
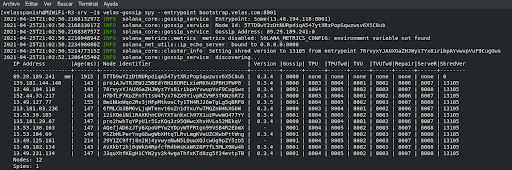
Join the gossip network and try to view all the other nodes in the cluster.
[velas@node~]$ velas-gossip spy --entrypoint bootstrap.velas.com:8001
You should see in the terminal the list of active nodes in the network as well as your computer in "Spy" mode
STEP 3. System Tuning
Increase UDP buffers
[velas@node ~]$ sudo bash -c "cat >/etc/sysctl.d/20-velas-udp-buffers.conf <<EOF
> # Increase UDP buffer size
> net.core.rmem_default = 134217728
> net.core.rmem_max = 134217728
> net.core.wmem_default = 134217728
> net.core.wmem_max = 134217728
> EOF"
[velas@node ~]$ sudo sysctl -p /etc/sysctl.d/20-velas-udp-buffers.conf
[sudo] password for velasnode:
net.core.rmem_default = 134217728
net.core.rmem_max = 134217728
net.core.wmem_default = 134217728
net.core.wmem_max = 134217728
Increase memory-mapped files limit
[velas@node ~]$ sudo bash -c "cat >/etc/sysctl.d/20-velas-mmaps.conf <<EOF
> # Increase memory mapped files limit
> vm.max_map_count = 500000
> EOF"
Add LimitNOFILE=500000 to the [Service] section of your systemd service file, if you use one, otherwise, add it to /etc/systemd/system.conf.
[velas@node ~]$ sudo systemctl daemon-reload
[velas@node ~]$ sudo bash -c "cat >/etc/security/limits.d/90-velas-nofiles.conf <<EOF
> # Increase process file descriptor count limit
> * - nofile 500000
> EOF"
STEP 4. Create Your Identity & Vote Account
Before we begin, let's understand the function of these two accounts.
Vote Account
A vote account can be created with the create-vote-account command. The vote account can be configured when first created or after the validator is running. All aspects of the vote account can be changed except for the vote account address, which is fixed for the lifetime of the account. This account collects rewards from the commission that the node has set
Visit vote account management for more information.
Validator Identity
The validator identity is a system account that is used to pay for all the vote transaction fees submitted to the vote account. Because the validator is expected to vote on most valid blocks it receives, the validator identity account is frequently (potentially multiple times per second) signing transactions and paying fees. For this reason, the validator identity keypair must be stored as a "hot wallet" in a keypair file on the same system the validator process is running. Because a hot wallet is generally less secure than an offline or "cold" wallet, the validator operator may choose to store only enough VLX on the identity account to cover voting fees for a limited amount of time, such as a few weeks or months. The validator identity account could be periodically topped off from a more secure wallet.
This practice can reduce the risk of loss of funds if the validator node's disk or file system becomes compromised or corrupted.
The validator identity is required to be provided when a voting account is created. The validator identity can also be changed after an account is created by using the vote-update-validator command.
Note: You will have to save both seeds, for your identity and vote account, in the case you lose your seeds you will lose control over the account, please be careful.
Generate identity
Option 1. System Keypair Create an identity keypair for your validator by running
[velas@node ~]$ velas-keygen new -o ~/validator-keypair.json
Generating a new keypair
For added security, enter a BIP39 passphrase
NOTE! This passphrase improves security of the recovery seed phrase NOT the
keypair file itself, which is stored as insecure plain text
BIP39 Passphrase (empty for none):
Wrote new keypair to /home/velasnode/validator-keypair.json
=========================================================================
pubkey: FncgcZc6QAo6utJyZvp5Cp9eNxXvG9T7yCFKdH6VdXin
=========================================================================
Save this seed phrase to recover your new keypair:
coach omit master vapor certain case powder stock swarm voice viable evil
=========================================================================
The identity public key can now be viewed by running
[velas@node ~]$ velas-keygen pubkey ~/validator-keypair.json
FncgcZc6QAo6utJyZvp5Cp9eNxXvG9T7yCFKdH6VdXin
By default, the validator-keypair.json is stored in the “ /home/user ” directory. You can change “~/” to use the directory you prefer.
Now that you have a keypair, set the velas configuration to use your validator keypair for all following commands
[velas@node~]$ velas config set --keypair ~/validator-keypair.json
onfig File: /home/velasnode/.config/velas/cli/config.yml
RPC URL: https://explorer.velas.com/rpc
WebSocket URL: wss://explorer.velas.com/rpc (computed)
Keypair Path: /home/velasnodevalidator-keypair.json
Commitment: confirmed
Option 2. Paper Wallet Identity You can create a paper wallet for your identity file instead of writing the keypair file to disk with
[velas@node ~]$ velas-keygen new --no-outfile
The corresponding identity public key can now be viewed by running
[velas@node ~]$ velas-keygen pubkey ASK
Create Vote Account
Create a vote-account keypair and create the vote account on the network.
[velas@node ~]$ velas-keygen new -o ~/vote-account-keypair.json
Generating a new keypair
For added security, enter a BIP39 passphrase
NOTE! This passphrase improves security of the recovery seed phrase NOT the
keypair file itself, which is stored as insecure plain text
BIP39 Passphrase (empty for none):
Wrote new keypair to /home/velasspanish/vote-account-keypair.json
=============================================================================
pubkey: FM8V7mFGtC7msjXZhn8gzfgXVGSVJyWrYno4tW5rNjCY
=============================================================================
Save this seed phrase to recover your new keypair:
loan illegal clip style electric use elevator repeat auto mule educate cotton
=============================================================================
Now that we have created our identity and vote account, it is time to link them to be able to identify ourselves in the network and synchronize our node.
To do this, we will need some VLX Native funds in the identity account, these will serve two functions:
- Relate the identity account and the vote account in the next step (Create Vote account in the network)
- Pay the commissions of the transactions in which the node participates
You should have your public address noted, in any case, you can see it again
[velas@node ~]$ velas-keygen pubkey ~/validator-keypair.json
FncgcZc6QAo6utJyZvp5Cp9eNxXvG9T7yCFKdH6VdXin
velas@node ~]$
You can see how much balance the account has with the following command
velas@node ~]$
velas balance FncgcZc6QAo6utJyZvp5Cp9eNxXvG9T7yCFKdH6VdXin
0
velas@node ~]$
Send some VLX Native from our Velas Wallet
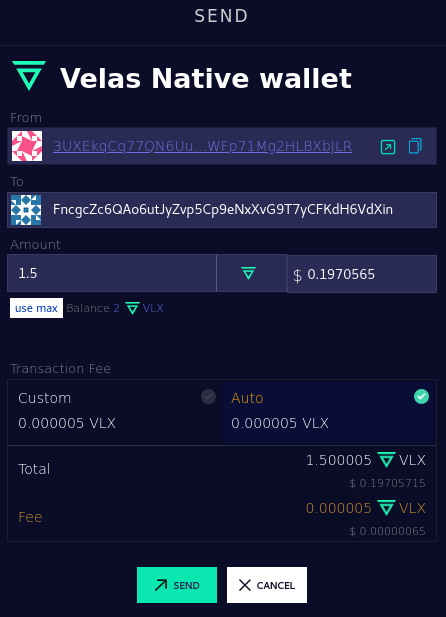
If you check the balance, you will now see your VLX balance in the identity account
velas@node ~]$
velas balance FncgcZc6QAo6utJyZvp5Cp9eNxXvG9T7yCFKdH6VdXin
1.5 VLX
velas@node ~]$
Now that we have some VLX in the identity account, it's time to create the vote account on the blockchain.
[velas@node ~]$ velas create-vote-account ~/vote-account-keypair.json ~/validator-keypair.json
Signature: 4Mo33Y6SNkBUjtCpdfdmCeBK5T7eMkAyRKQ7QZz12EDZx8qs6j2Tj9G26vBUBpjTbz95zUdhMEU3dV8TRsh6evNz
Note: If you are using an identity stored in a paper wallet instead of a Keypair system file on your computer, replace ~/validator-keypair.json for ASK which will suggest you enter your seed corresponding to the identity account.
Keypair files are stored on your computer and therefore can be exposed in case your security is compromised, only send a sufficient amount of VLX Native to pay commissions for a period of time, 1-3 months, an amount of 100-300 VLX should be sufficient for a considerable period of time.
STEP 5. Connect Your Validator
The command that allows executing the node is velas-validator if you write it in the console you will be able to see all the possible arguments and options when executing your node.
- If your computer does not have a GPU or is not compatible with CUDA, you should not add
--cudain the command line. - By default, the ledger will grow until there is no more space left on the hard drive, adding the arg
--limit-ledger-sizewe will limit the file to a maximum of 500 GB. - You can control the range of ports that the node will use to connect, by default it is recommended to open port range 8000-10000. Make sure your system clock is synchronized.
The system without a compatible GPU or CUDA
[velas@node ~]$ screen velas-validator --identity ~/validator-keypair.json --vote-account ~/vote-account-keypair.json --ledger /home/velasnode/ledger/ --rpc-port 8899 --dynamic-port-range 8000-8010 --entrypoint bootstrap.velas.com:8001 --limit-ledger-size --expected-shred-version 17211 --max-genesis-archive-unpacked-size 707374182 --log -
A system with a compatible GPU or CUDA available
[velas@node ~]$ screen velas-validator --cuda --identity ~/validator-keypair.json --vote-account ~/vote-account-keypair.json --ledger /home/velasnode/ledger/ --rpc-port 8899 --dynamic-port-range 8000-8010 --entrypoint bootstrap.velas.com:8001 --limit-ledger-size --expected-shred-version 17211 --max-genesis-archive-unpacked-size 707374182 --log -
Custom or optional settings
“--identity ASK and/or --vote-account ASK If you are using paper wallets instead of keypairs on the system, you need to change the path to the corresponding file by the ASK argument.
--limit-ledger-size <size> You can limit the size of the ledger to a maximum of 100 GB by replacing <size> for 50,000,000, you can assign another value as long as it is higher.
STEP 6. Delegate Stake
By default, your node will not have any delegated balance. So that the node can act as a leader and receive a reward for validation it is necessary that it always have 1 million or more delegated VLX, either from the node owner, from other delegates, or the sum of both. The easiest way to delegate your coins is from the Velas wallet.
STEP 7. Check Your Node
You will be able to see your node in the list of active nodes and identify it by your vote account and/or identity, the list of ports it is using, and its public IP, in a new window run velas-gossip spy.
[velas@node ~]$ velas-gossip spy --entrypoint bootstrap.velas.com:8001
You will also see the process open on your server if you run htop command.
